Pupil Player
Pupil Player is the second tool you will use after Pupil Capture. It is a media and data visualizer at its core. You will use it to look at Pupil Capture recordings. Visualize your data and export it.

Load a recording
Drag the recording folder (the triple digit one) directly onto the app icon or launch the application and drag + drop the recording folder into the Pupil Player window.
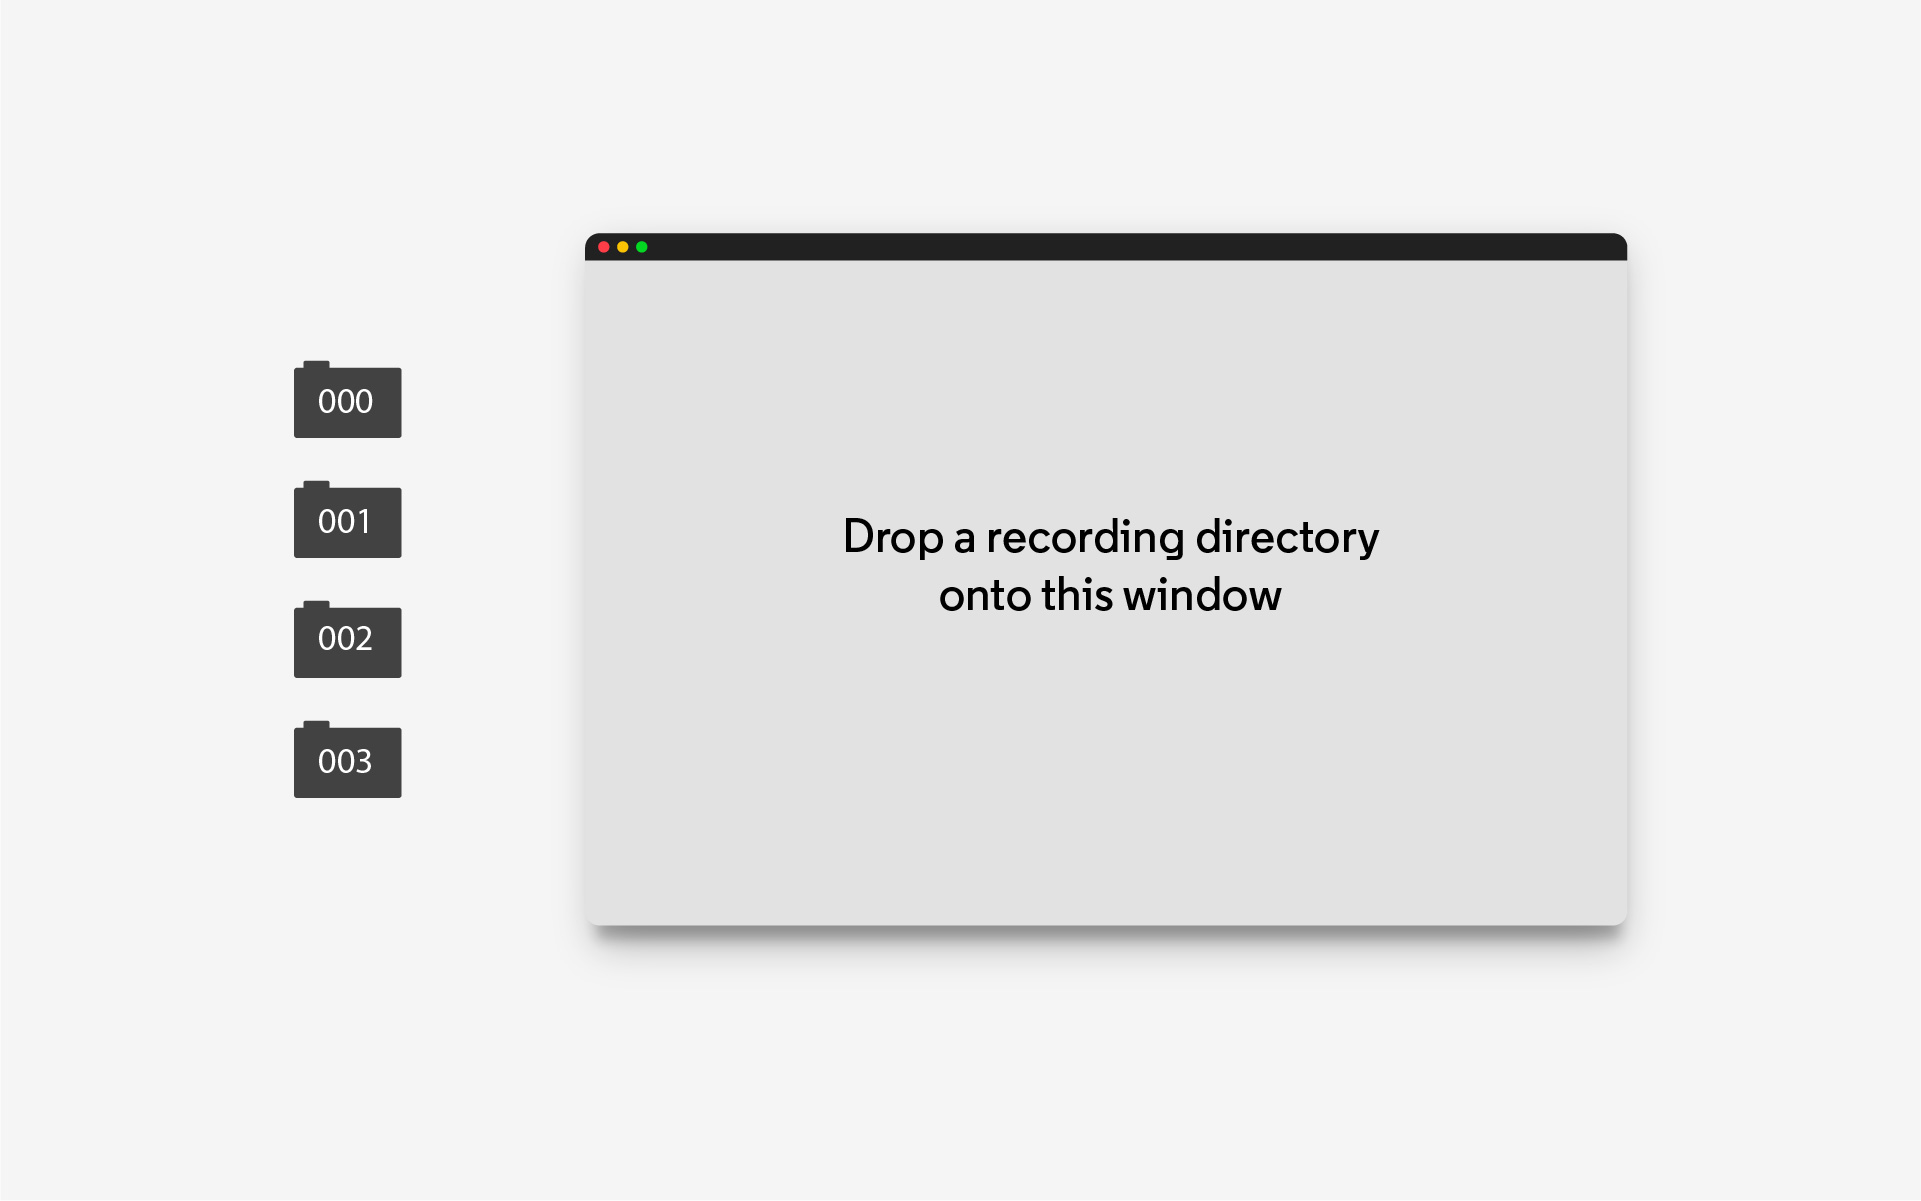
Don't have a recording yet? Download a sample recording.
Player Window
The Player window is the main control center for Pupil Player. It displays video and data recorded by Pupil Capture or Pupil Invisible.
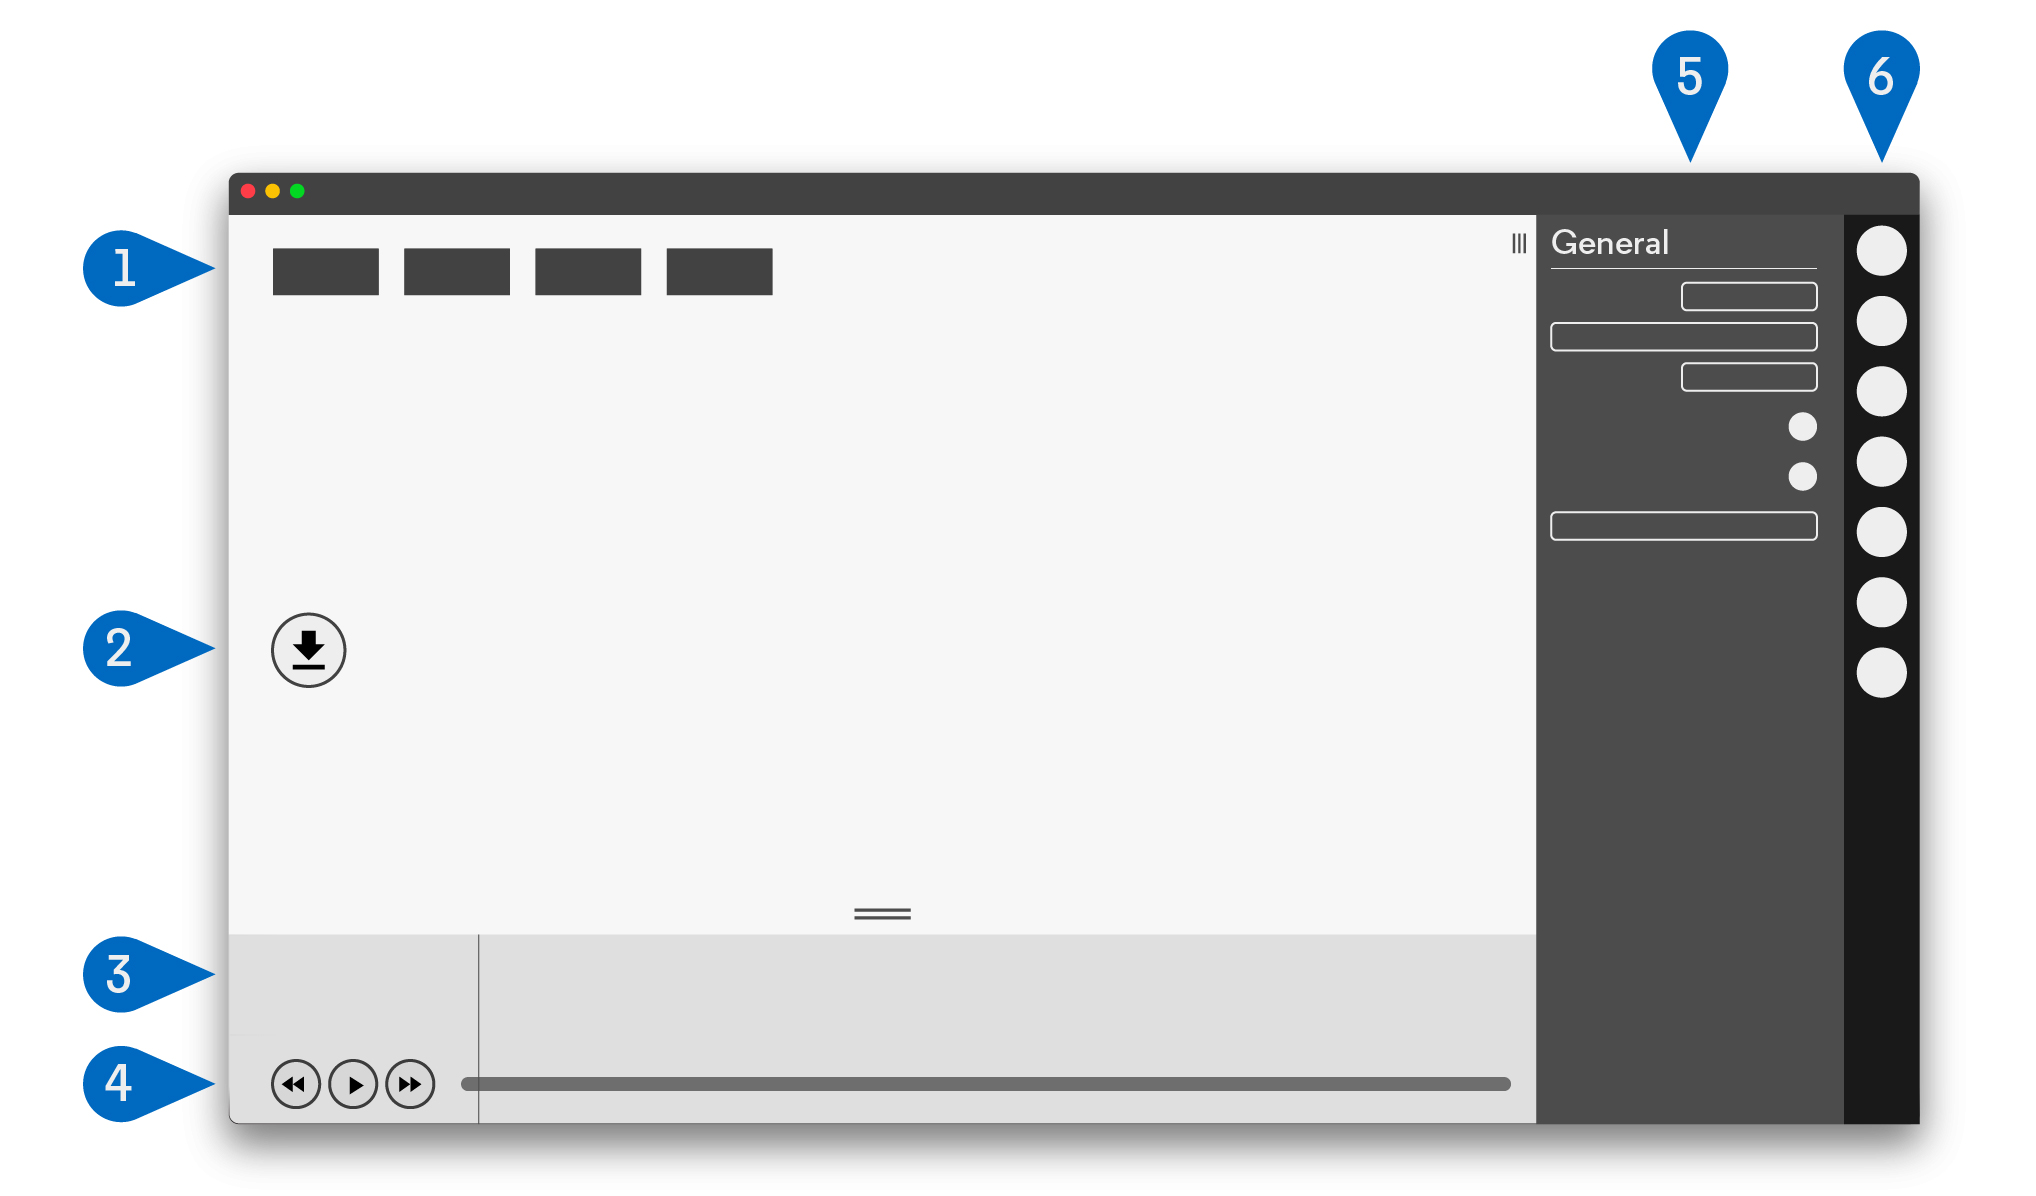
Graphs: This area contains performance graphs. The graphs display
CPU,FPS, and pupil algorithm detection confidence.Hot keys: This area contains clickable buttons for plugins.
Timeline Events: Plugins can add temporal events to this expandable panel.
Timeline: Control the playback of the video with the play/pause button (or spacebar on your keyboard). Drag the playhead (vertical line) to the desired point in time.
- Trimming: Drag either end of the timeline to set a trim beginning and ending trim marks. The trim section marks directly inform the section of video/data to export.
- Frame Stepping: You can use the arrow keys on your keyboard or the
<<>>buttons to advance one frame at a time while the playback is paused. - Playback Speed: To change the playback speed, use the arrow keys on your keyboard or the
<<>>buttons during playback. There are 5 available playback speeds:0.25x,0.5x,1x(default),2x,4x.
Menu: This area contains settings and contextual information for each plugin.
Sidebar: This area contains clickable buttons for each plugin. System plugins are loaded in the top and user added plugins are added below the horizontal separator.
Keyboard Shortcuts
| Keyboard Shortcut | Description |
|---|---|
<space> | Play and pause video |
<arrow left> | Step to previous frame* / Decrease playback speed** |
<arrow right> | Step to next frame* / Increase playback speed** |
e | Start export |
a | Surface tracker: Add new surface |
x | Add annotation (default keyboard shortcut) |
f | Fixation: Show next |
F | Fixation: Show previous |
* While paused ** During playback
Workflow
Pupil Player is similar to a video player. You can playback recordings and can load plugins to build visualizations.
Here is an example workflow:
- Start Pupil Player
- Open a Plugin - From the
Plugin ManagerGUI menu load theVis Circleplugin. - Playback - press the play button or
spacebar on your keyboard to view the video playback with visualization overlay, or drag the playhead in the seek bar to scrub through the dataset. - Set trim marks - you can drag the green rounded rectangle at the beginning and end of the seekbar to set the trim marks. This will set the start and end frame for the exporter and for other plugins.
- Export Video & Raw Data - From the
Plugin Managerview, load theWorld Video Exporterplugin and theRaw Data Exporterplugin. Presseon your keyboard or thedownload iconbutton in the left hand side of the window to start the export. - Check out exported data in the
exportsdirectory within your recording directory
TIP
Pupil Player will never remove or overwrite any of your raw data gathered during capture. All exports are isolated within a sub-directory named exports. Exports will never be overwritten.
Plugins
Pupil Player uses the same Plugin framework found in Pupil Capture to add functionality.
Visualizations, marker tracking, and the exporter are all implemented using this structure. Very little work (often no work) needs to be done to make a Capture Plugin work for the Pupil Player and vice versa.
There are two general types of plugins:
- Unique: You can only launch one instance of this plugin.
- Not unique: You can launch multiple instances of this type of plugin. For example, you can load one
Vis Circleplugin to render the gaze position with a translucent green circle, and anotherVis Circleplugin to render the gaze circle with a green stroke of 3 pixel thickness. You can think of these types of plugins as additive.
In the following sections we provide a summary of plugins currently available and in Pupil Player.
Visualization Plugins
We will call plugins with the Vis prefix visualization plugins. These plugins are simple plugins, are mostly additive (or not unique), and directly operate on the gaze positions to produce visualizations. Other plugins like Surface Tracker also produces visualizations, but will be discussed elsewhere due to the extent of its features.
Vis Circle
Visualize the gaze positions with a circle for each gaze position. This plugin is not unique, therefore you can add multiple instances of the plugin to build your visualization.
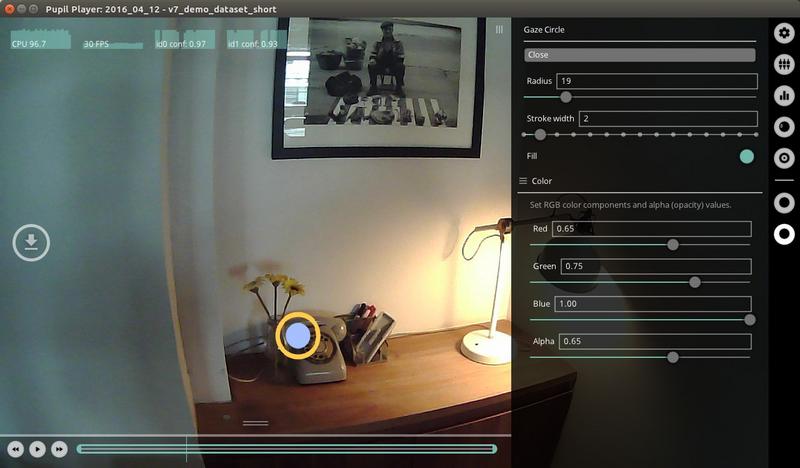
You can set the following parameters:
radius- the radius of the circle around the gaze point.stroke width- the thickness or width of the stoke in pixels.fill- toggle on for a circle with solid fill. Toggle off for a circle with only stroke.color- define thered,green,bluevalues for color.Alphadefines the opacity of the stroke and fill.
Here we show an example of how you could use 2 instances of the Vis Circle Plugin. The first instance renders the gaze position as a filled yellow circle. The second instance renders the same gaze position as an orange stroke circle.
Vis Cross
Visualize the gaze positions with a cross for each gaze position. This plugin is not unique, therefore you can add multiple instances of the plugin to build your visualization. You can set the following parameters:
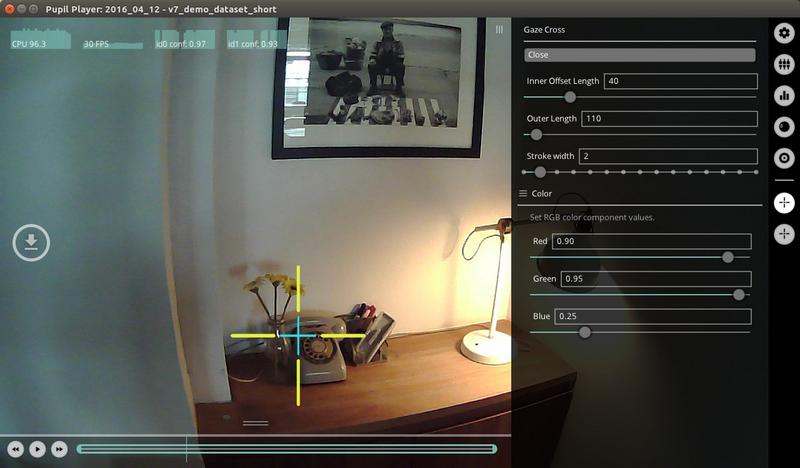
inner offset length- the distance in pixels to offset the interior cross endpoints from the gaze position. A value of0will make the crosshairs intersect the gaze position.outer length- The length of the cross lines in pixels from the gaze position. Note - equal values ofinner offset lengthandouter lengthwill result in a cross with no length, and therefore not rendered.stroke width- the thickness or width of the stoke in pixels.color- define thered,green,bluevalues for color.
Here we show an example of how you could use 2 instances of the Vis Cross Plugin. The first instance renders the gaze position as a red cross with that extends to the boundaries of the screen. The second instance renders the gaze position as a green cross, with a heavier stroke weight.
Vis Polyline
Visualize the gaze positions with a polyline for each gaze position.
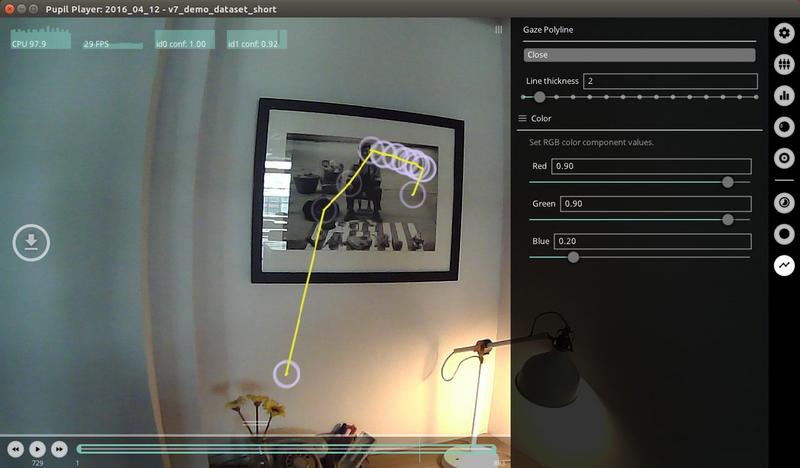
This plugin is not unique, therefore you can add multiple instances of the plugin to build your visualization. You can set the following parameters:
line thickness- the thickness or width of the polyline stroke in pixels.color- define thered,green,bluevalues for color.
An example showing Vis Polyline used with Vis Circle. The polyline enables one to visualize the sequence of the gaze positions over a single world frame.
Vis Light Points
Visualize the gaze positions as a point of light for each gaze position. The falloff of the light from the gaze position is specified by the user.

This plugin is not unique, therefore you can add multiple instances of the plugin to build your visualization. You can set the following parameters:
falloff- The distance (in pixels) at which the light begins to fall off (fade to black). A very low number will result in a very dark visualization with tiny white light points. A very large number will result in a visualization of the world view with little or no emphasis on the gaze positions.
Here is an example demonstrating Vis Light Points with a falloff of 73.
Vis Eye Video Overlay
Here is an example of the Eye Video Overlay with binocular eye videos.
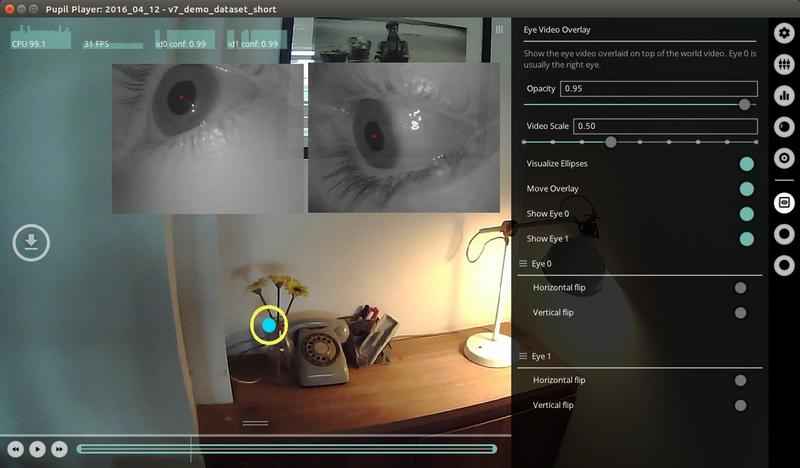
This plugin can be used to overlay the eye video on top of the world video. Note that the eye video is not recorded by default in Pupil Capture so if you want to use this plugin, make sure to check record eye video in Pupil Capture.
This plugin is unique, therefore you can only load one instance of this plugin. You can set the following parameters:
opacity- the opacity of the overlay eye video image.1.0is opaque and0.0is transparent.video scale- use the slider to increase or decrease the size of the eye videos.move overlay- toggleonand then click and drag eye video to move around in the player window. Toggleoffwhen done moving the video frames.show- show or hide eye video overlays.horiz. and vert. flip- flip eye videos vertically or horizontally
Analysis Plugins
These plugins are simple unique plugins, that operate on the gaze data for analysis and visualizations.
Surface Tracker
This plugin is a post-hoc version of the Surface Tracking plugin for Pupil Capture. You can use this plugin to detect markers in the recording, define surfaces, edit surfaces, and create and export visualizations of gaze data within the defined surfaces.
![]()
Here is an example workflow for using the Surface Tracker plugin to generate heatmap visualizations and export surface data reports:
- Load the
Surface Trackerplugin - if you already have surfaces defined, the load may take a few seconds because the plugin will look through the entire video and cache the detected surfaces. - Add surface - if you do not have any defined surfaces, you can click on the
Add surfacebutton when the markers you want to user are visible or just click the circularAbutton in the left hand side of the screen. - Surface name and size - In the
Surface Trackermenu GUI, define the surface name and real world size. Note - defining size is important as it will affect how heatmaps are rendered. - Set trim marks - optional, but if you want to export data for a specific range, then you should set the trim marks.
- Recalculate gaze distributions - click the
(Re)calculate gaze distributionsbutton after specifying surface sizes. You should now see heatmaps in the Player window (if gaze positions were within your defined surfaces). - Export gaze and surface data - click
eand all surface metrics reports will be exported and saved for your trim section within yourexportfolder.
All files generated by the Surface Tracker will be located in the subfolder surfaces. The different reported metrics are:
surface_visibility.csv- Overview of how many world camera frames each surface was contained in.surface_gaze_distribution.csv- Overview of how many gaze samples have been collected on each individual surface and outside of surfaces.surface_events.csv- List of image-enter and image-exit events for all surfaces.
Further the following metrics are reported for every individual surface. Each surface has a name, which can be manually set as described above. This name is augmented by an automatically generated numerical identifier.
heatmap_<surface_name>.png- Heatmap of gaze positions on the surface aggregated over the entire export.gaze_positions_on_surface_<surface_name>.csv- A list of gaze datums on the surface. The values include the gaze point in two different coordinates systems.x_normandy_normare coordinates between 0 and 1, where(0,0)is the bottom left corner of the surface and(1,1)is the top right corner.x_scaledandy_scaledcontain the same coordinates but scaled with the size defined for the surface.surf_positions_<surface_name>- List of surface positions in 3D. The position is given as the 3D pose of the surface in relation to the current position of the scene camera.img_to_surf_transis a matrix transforming coordinates from the camera coordinate system to the surface coordinate system.surf_to_img_transis the inverse ofimg_to_surf_trans.
Additionally, the Surface Tracker exports the detected markers to the marker_detections.csv file. The world_index column represents the scene video frame index, marker_uid is the label used for identifying a single marker, and corner_<0|1|2|3>_<x|y> is the corner coordinate in pixel space.
Fixation Detector
The post-hoc fixation detector calculates fixations for the whole recording. The menu gives feedback about the progress of the detection, how many fixations were found, and shows detailed information about the current fixation. Press f or click the f hot key button on the left hand side of the window to seek forward to the next fixation.
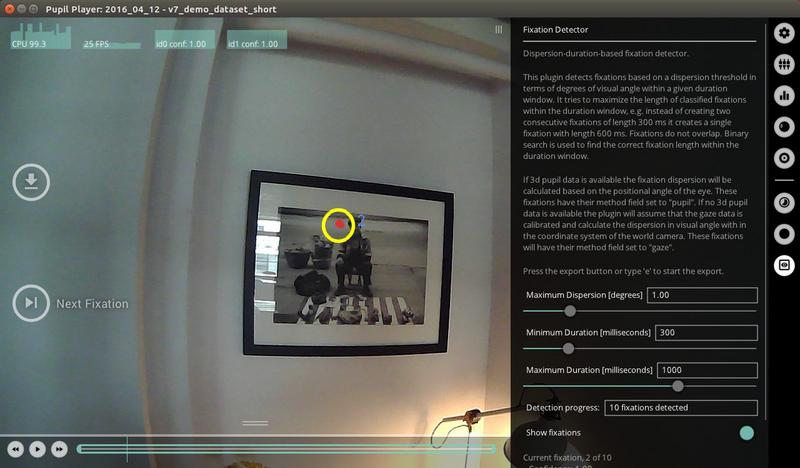
Toggle Show fixations to show a visualization of fixations. The blue number is the number of the fixation (0 being the first fixation). You can export fixation reports for your current trim section by pressing e on your keyboard or the e hot key button on the left hand side of the window.
You can find more information in our dedicated fixation detection section.
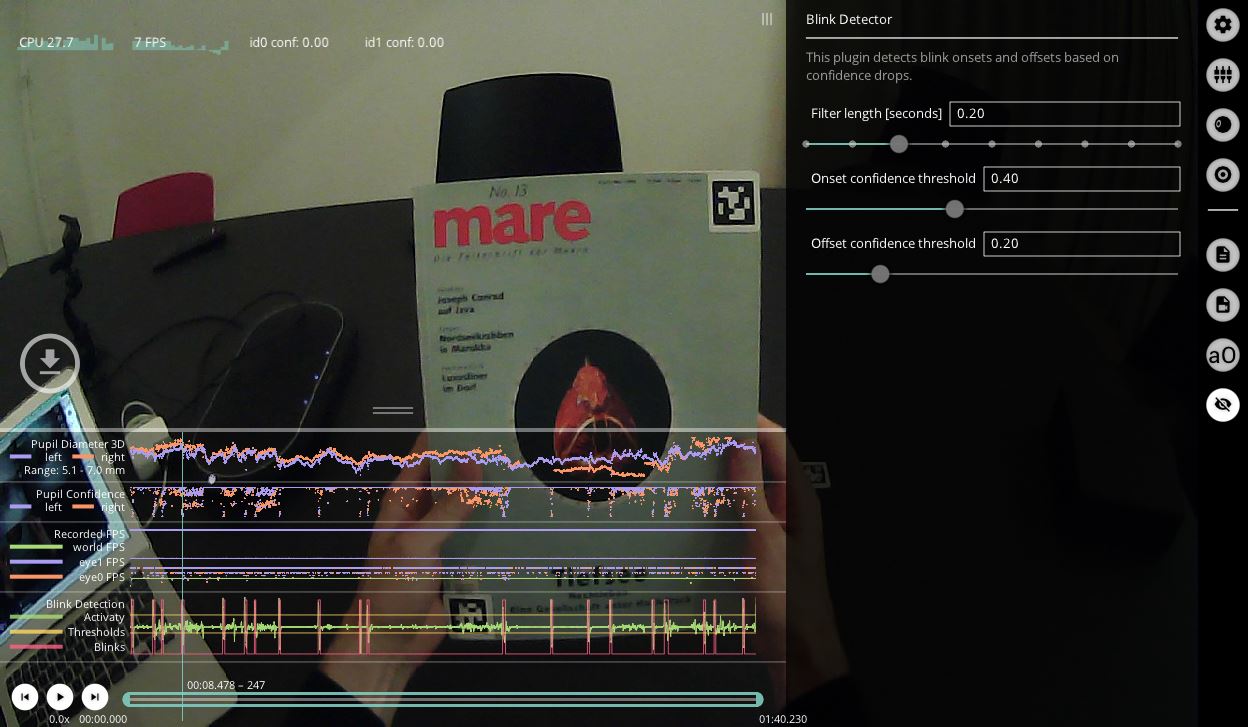
Blink Detector
Pupil Core's Blink Detector leverages the fact that 2D pupil confidence drops rapidly in both eyes during a blink as the pupil becomes obscured by the eyelid, followed by a rapid rise in confidence as the pupil becomes visible again.
The Blink Detector processes 2D pupil confidence values by convolving them with a filter. The filter response – called 'activity' – spikes the sharper the confidence drop is and vice versa for confidence increases.
Blinks are subsequently detected based on onset and offset confidence thresholds and a filter length in seconds.
- Onset Confidence Threshold: The threshold that the filter response ('Activity') must rise above to classify the onset of a blink, corresponding to a sudden drop in 2D pupil detection confidence
- Offset Confidence Threshold: The threshold that the filter response ('Activity') must fall below to classify the end of a blink, corresponding to a rise in 2D pupil detection confidence
- Filter Length: The time window's length in which the detector tries to find confidence drops and gains
In Pupil Player, the green data series labelled 'Activity' is the filter response, and the yellow bars that denote onset and offset confidence are above and below this, respectively. The blink detection result is shown by the red line, characterised by a step function where blinks have been classified.
TIP
See our Best Practices for tips on choosing appropriate Blink Detector thresholds
Results are exported in blinks.csv with the following columns:
| Key | Description |
|---|---|
id | Numerical ID of blink |
start_timestamp | Blink end timestamp (s) |
duration | Blink duration (s) |
end_timestamp | Blink start timestamp (s) |
start_frame_index | Blink start world frame index |
index | Blink median world frame index |
end_frame_index | Blink end world frame index |
confidence | Mean of absolute filter response during blink clamped at 1 |
filter_response | Filter response ('Activity') during blink |
base_data | Timestamps of data associated with blink |
TIP
Blink count is included in the blink_detection_report.csv
Head Pose Tracking
This plugin uses fiducial markers (apriltag) to build a 3d model of the environment and track the headset's pose within it. Note, only markers of the default tag36h11 family are currently supported by the head pose tracker plugin.
TIP
The markers used must be unique and of the same size. You may not use multiple instances of the same marker ID within your environment.
See the surface tracking section for images of the markers to download.
Head pose tracking works best in a well lit environment with an even distribution of light, so that the tracking markers are clearly visible. Try to avoid situations where the world-camera faces into bright light, such as sunlight entering through a window in an otherwise dim room.
By default, the location of the first visible marker will be used as the origin of the 3d model's coordinate system. In the plugin's menu, you can change the marker that is being used as the origin. The unit of the coordinate system is defined as the physical length of the tracking markers.
Results are exported in the following files:
head_pose_tracker_model.csv: A list of all markers used to generate the 3d model and the 3d locations of the marker vertices.head_pose_tracker_poses.csv: The world camera's pose within the 3d model coordinate system for each recorded world frame with the following columns:
| Key | Description |
|---|---|
timestamp | World timestamp |
rotation_x | Rodrigues' rotation vector x-component 1 |
rotation_y | Rodrigues' rotation vector y-component 1 |
rotation_z | Rodrigues' rotation vector z-component 1 |
translation_x | Translation vector x-component 2 |
translation_y | Translation vector y-component 2 |
translation_z | Translation vector z-component 2 |
pitch | Orientation about the x-axis (head tilt from front to back) in degrees 3 |
yaw | Orientation about the y-axis (head rotation from side to side) in degrees 3 |
roll | Orientation about the z-axis (head tilt from side to side) in degrees 3 |
- The Rodrigues' rotation vector describes the rotation axis, and its length encodes the angle to rotate in radians
- Units are scaled to the length of the tracking markers
- The Euler convention is dependent on the origin tracking marker's orientation (see below).
Positioning of the origin marker is crucial to ensure that pitch, yaw and roll correspond to expected head movements using the right-hand convention, where:
- Upward head tilt corresponds to a positive pitch angle
- Rightward head rotation corresponds to a positive yaw angle
- Rightward head tilt corresponds to a positive roll angle
The correct position of the origin marker is vertical relative to the earth (e.g. on a computer monitor) pointing upwards:
TIP
Euler angles are an intuitive representation of rotation. However, they can be subject to the effects of gimbal lock. Luckily, most head movements associated with eye tracking should not lead to this situation with correct positioning of the origin marker
IMU Timeline
This plugin visualizes accelerometer and gyroscope data from Pupil Invisible recordings. It also fuses the data using Madgwick's algorithm to yield drift-free orientation estimates in the pitch and roll axes.

Why fuse the data? Numerical integration of angular rate is subject to position errors that grow with time. Accurate estimates of orientation therefore require drift correction. Madgwick's algorithm removes orientation drift in the pitch and roll axes using accelerometer feedback to monitor position relative to gravity.
In the Plugin's menu, toggle View raw timeline to view the accelerometer and gyroscope readings and View orientation timeline for pitch and roll. You can also change Madgwick's beta. This value is associated with gyroscope mean error. Increasing the beta will lead to faster drift corrections but with more sensitivity to lateral accelerations. Read more about Madgwick's algorithm here.
Results are exported in imu_timeline.csv with the following columns:
| Key | Description |
|---|---|
imu_timestamp | Timestamp of the IMU reading |
world_index | Associated_frame: closest world video frame |
gyro_x | Angular velocity about the x-axis in deg/s |
gyro_y | Angular velocity about the y-axis in deg/s |
gyro_z | Angular velocity about the z-axis in deg/s |
accel_x | Linear acceleration along the x-axis in G (9.80665 m/s2) |
accel_y | Linear acceleration along the y-axis in G (9.80665 m/s2) |
accel_z | Linear acceleration along the z-axis in G (9.80665 m/s2) |
pitch | Orientation about the x-axis (head tilt from front to back) in degrees |
roll | Orientation about the z-axis (head tilt from side to side) in degrees |
This Plugin does not estimate orientation about the yaw axis (head rotation from left to right). This is because the IMU has no magnetometer to monitor heading. The Plugin therefore implements a version of Madgwick's algorithm that only estimates Pitch and Roll.
Note that this Plugin will not be loaded with Pupil Core recordings.
Pupil Data And Post-hoc Detection
By default, Player starts with the Pupil Data From Recording plugin that tries to load pupil positions that were detected and stored during a Pupil Capture recording. Alternatively, one can run the pupil detection post-hoc.
Post-hoc Pupil Detection and Gaze Mapping
Post-hoc Calibration For Another Recording
Post-hoc Gaze Mapping Validation
Post-hoc Pupil Detection
The Post-hoc Pupil Detection plugin can be used with any dataset where eye videos were recorded. The plugin tries to load the eye videos, and runs the pupil detection algorithm in separate processes.
This plugin is available starting with Pupil Player v0.9.13.
The Redetect button restarts the detection procedure. You can use the Post-hoc Pupil Detection plugin to debug, improve, and gain insight into the pupil detection process.
Gaze Data And Post-hoc Calibration
By default, Player starts with the Gaze Data From Recording plugin that tries to load gaze positions that were detected and stored during a Pupil Capture recording. Alternatively, one can run the gaze mapping process post-hoc.
Post-hoc Calibration
The Post-hoc Gaze Calibration plugin enables you to calibrate, map, and validate gaze post-hoc and is available starting with Pupil Player v0.9.13. It can be used on any Pupil dataset.
The workflow is separated into three steps, each with its own submenu: Reference Locations, Calibrations, and Gaze Mappers.
Reference locations are points within the recorded world video that are known to have been fixated on by the participant/subject. They can either be automatically detected or manually annotated:
Detect Circle Markers in Recording: This button starts the automatic detection of circular calibration markers within the world video. The progress is visualized in the plugin's timeline.Manual Edit Mode: When this option is enabled, you can add new locations as well as correct and delete existing ones. There can only be one location per world frame.
As in Capture, one can have more than one calibration per recording. A calibration on its own does not result in gaze data. Rather, it contains the required parameters to map pupil to gaze data. Each has the following properties:
Name: Used to correctly select a calibration for each gaze mapper (see below).Mapping Method:2duses polynomial regression, or3duses bundle adjustment calibration.Reference Range: Time range that indicates which reference locations to use.
Calibrations are stored as plcal files in the recording's calibration subfolder. You can copy and apply them to recordings that do not include reference locations. See the instructional video below for details.
In order to apply a calibration to pupil data, one needs a gaze mapper. Each gaze mapper has the following properties:
Calibration: One of the previously created or imported calibrations (see screencast)Mapping Range: Time range in which pupil data will be mapped to gaze data.Manual Correction: Apply a fixed offset to your gaze mapping.Validation: You can validate the accuracy and precision of the mapped gaze by comparing it to reference locations in the selectedValidation Range. It uses the same methodology as theAccuracy Visualizer.
WARNING
Overlapping mapping ranges result in multiple gaze points per gaze datum. This can be temporarily disabled by turning off the according gaze mapper's Activate Gaze option.
TIP
You can compare 2d and 3d mapping results by creating two calibrations and gaze mappers with the same calibration and mapping ranges.
Developing your own Plugin
To develop your own plugin see the developer guide.
Product-specific plugins
Some plugins in Pupil Player only load if they are able to be used with the product that created the recordings.
Here is a list of what plugins are available based on the product that generated the recording:
| Pupil Player Plugin | Pupil Core | Pupil Invisible | Pupil Mobile |
|---|---|---|---|
| Blink detection | ✔️ | ➖ | ✔️ |
| Fixation detection | ✔️ | ➖ | ✔️ |
| Post-hoc pupil detection | ✔️ | ➖ | ✔️ |
| Post-hoc gaze calibration | ✔️ | ➖ | ✔️ |
| Pupil from recording | ✔️ | ➖ | ➖ |
| Gaze from recording | ✔️ | ✔️ | ➖ |
| IMU timeline | ➖ | ✔️ | ➖ |
Changelog
Changed in version 3.3:
- Removed the
“Pupil from recording”option, as there is no pupillometry data to load from Pupil Invisible recordings. Pupil Player will no longer generate an emptypupil_positions.csvfile after export.Added in version 3.2:
- Added product-specific plugins.
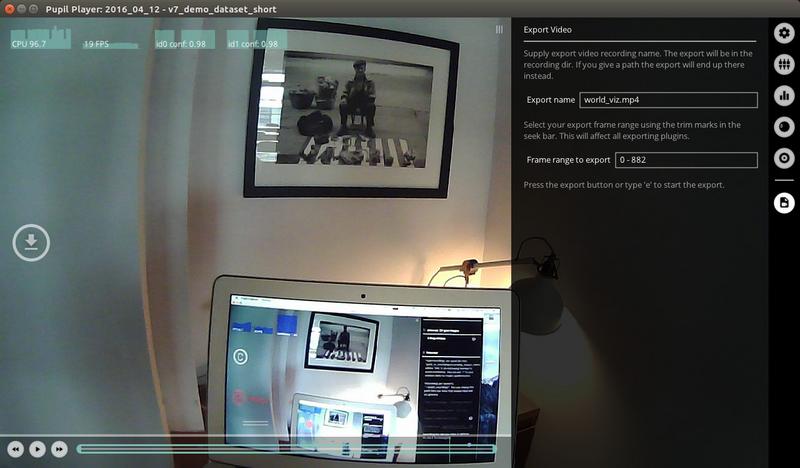
Export
You can export data and videos by pressing e on your keyboard or the e hot key button in the Pupil Player window.
All open plugins that have export capability will export when you press e. Exports are separated from your raw data and contained in the exports sub-directory. The exports directory lives within your recording directory.
Active video exporters will run in the background and you can see the progress bar of the export in the GUI. While exporting, you can continue working with Pupil Player and even launch new exports. Each video export creates at least one mp4 and its respective file timestamp file. See the Data Format section for details.
Export Directory
Every export creates a new folder within the exports sub-directory of your recording. All data from the export is saved to this folder.
Export Handling
You can select the frame range to export by setting trim marks in the seek bar or directly in the General Settings menu.
Longer running exports, e.g. video exports, go through three phases: Queued, Running, and Completed. Export tasks can be cancelled while being queued or running. Completed tasks are kept in the list for reference.
World Video Exporter
The World Video Exporter is loaded by default.
The export saves the world video as shown in Player, including all currently active visualizations (see Visualization Plugins).
General overview for exported video files:
The World and Eye video exporter saves the scene video file, together with numpy and csv files containing timestamps corresponding to each frame. The timestamps follow the Pupil Time convention. The csv timestamp files include an additional pts column. pts is an abbreviation for presentation timestamps and refers to the media file's internal time representation. It can be used to seek or identify specific frames within the media file. See this tutorial on how to extract individual frame images from the world video.
Eye Video Exporter
The Eye Video Exporter needs to be loaded explicitly through the Plugin Manager. It includes the option to render the 2d pupil detection result into the exported video.
iMotions Exporter
The iMotions Exporter creates data that can be used with https://imotions.com/.
Specifically, it undistorts the world video images using the camera intrinsics. Gaze data is also undistorted and exported to the gaze.tlv file.
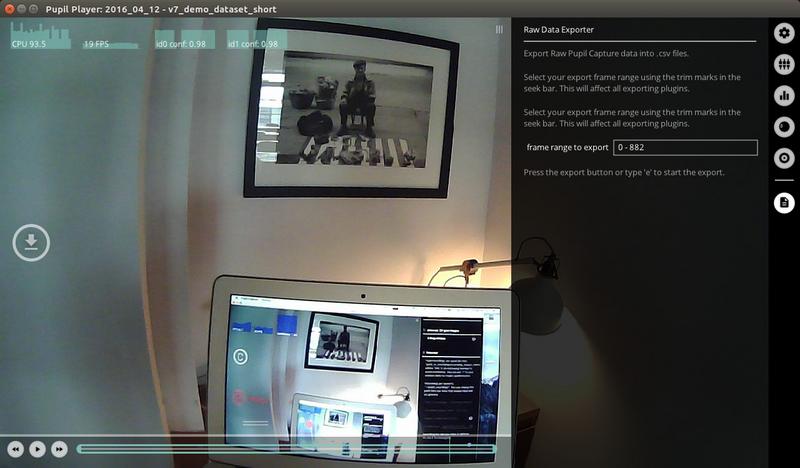
Raw Data Exporter
The Raw Data Exporter exports pupil and gaze data to .csv files and is active by default.
pupil_positions.csv
pupil_timestamp- timestamp of the source image frameworld_index- associated_frame: closest world video frameeye_id- 0 or 1 for left/right eyeconfidence- is an assessment by the pupil detector on how sure we can be on this measurement. A value of0indicates no confidence.1indicates perfect confidence. In our experience useful data carries a confidence value greater than ~0.6. Aconfidenceof exactly0means that we don't know anything. So you should ignore the position data.norm_pos_x- x position in the eye image frame in normalized coordinatesnorm_pos_y- y position in the eye image frame in normalized coordinatesdiameter- diameter of the pupil in image pixels as observed in the eye image frame (is not corrected for perspective)method- string that indicates what detector was used to detect the pupil
Data made available by 2d pupil detection:
ellipse_center_x- x center of the pupil in image pixelsellipse_center_y- y center of the pupil in image pixelsellipse_axis_a- first axis of the pupil ellipse in pixelsellipse_axis_b- second axis of the pupil ellipse in pixelsellipse_angle- angle of the ellipse in degrees
Data made available by 3d pupil detection:
diameter_3d- diameter of the pupil scaled to mm based on anthropomorphic avg eye ball diameter and corrected for perspective.model_confidence- confidence of the current eye model (0-1)model_id- id of the current eye model. When a slippage is detected the model is replaced and the id changes.sphere_center_x- x pos of the eyeball sphere is eye pinhole camera 3d space units are scaled to mm.sphere_center_y- y pos of the eye ball spheresphere_center_z- z pos of the eye ball spheresphere_radius- radius of the eyeball. This is always 12mm (the anthropomorphic avg.) We need to make this assumption because of thesingle camera scale ambiguity.circle_3d_center_x- x center of the pupil as 3d circle in eye pinhole camera 3d space units are mm.circle_3d_center_y- y center of the pupil as 3d circlecircle_3d_center_z- z center of the pupil as 3d circlecircle_3d_normal_x- x normal of the pupil as 3d circle. Indicates the direction that the pupil points at in 3d space.circle_3d_normal_y- y normal of the pupil as 3d circlecircle_3d_normal_z- z normal of the pupil as 3d circlecircle_3d_radius- radius of the pupil as 3d circle. Same asdiameter_3dtheta- circle_3d_normal described in spherical coordinatesphi- circle_3d_normal described in spherical coordinatesprojected_sphere_center_x- x center of the 3d sphere projected back onto the eye image frame. Units are in image pixels.projected_sphere_center_y- y center of the 3d sphere projected back onto the eye image frameprojected_sphere_axis_a- first axis of the 3d sphere projection.projected_sphere_axis_b- second axis of the 3d sphere projection.projected_sphere_angle- angle of the 3d sphere projection. Units are degrees.
gaze_positions.csv
gaze_timestamp- timestamp of the source image frameworld_index- associated_frame: closest world video frameconfidence- computed confidence between 0 (not confident) -1 (confident)norm_pos_x- x position in the world image frame in normalized coordinatesnorm_pos_y- y position in the world image frame in normalized coordinates
The fields below are not available for Pupil Invisible recordings:
base_data- "timestamp-id timestamp-id ..." of pupil data that this gaze position is computed from data made available by the 3d vector gaze mappersgaze_point_3d_x- x position of the 3d gaze point (the point the subject looks at) in the world camera coordinate systemgaze_point_3d_y- y position of the 3d gaze pointgaze_point_3d_z- z position of the 3d gaze pointeye_center0_3d_x- x center of eye-ball 0 in the world camera coordinate system (of camera 0 for binocular systems or any eye camera for monocular system)eye_center0_3d_y- y center of eye-ball 0eye_center0_3d_z- z center of eye-ball 0gaze_normal0_x- x normal of the visual axis for eye 0 in the world camera coordinate system (of eye 0 for binocular systems or any eye for monocular system). The visual axis goes through the eye ball center and the object thats looked at.gaze_normal0_y- y normal of the visual axis for eye 0gaze_normal0_z- z normal of the visual axis for eye 0eye_center1_3d_x- x center of eye-ball 1 in the world camera coordinate system (not available for monocular setups.)eye_center1_3d_y- y center of eye-ball 1eye_center1_3d_z- z center of eye-ball 1gaze_normal1_x- x normal of the visual axis for eye 1 in the world camera coordinate system (not available for monocular setups.). The visual axis goes through the eye ball center and the object thats looked at.gaze_normal1_y- y normal of the visual axis for eye 1gaze_normal1_z- z normal of the visual axis for eye 1
Annotation Player
This plugin loads any annotations generated during the recording, as well as allowing you to add annotations after the effect. With the Pupil Player interface, you can assign hotkeys to your annotations to ensure efficient labelling of important events in your recordings.
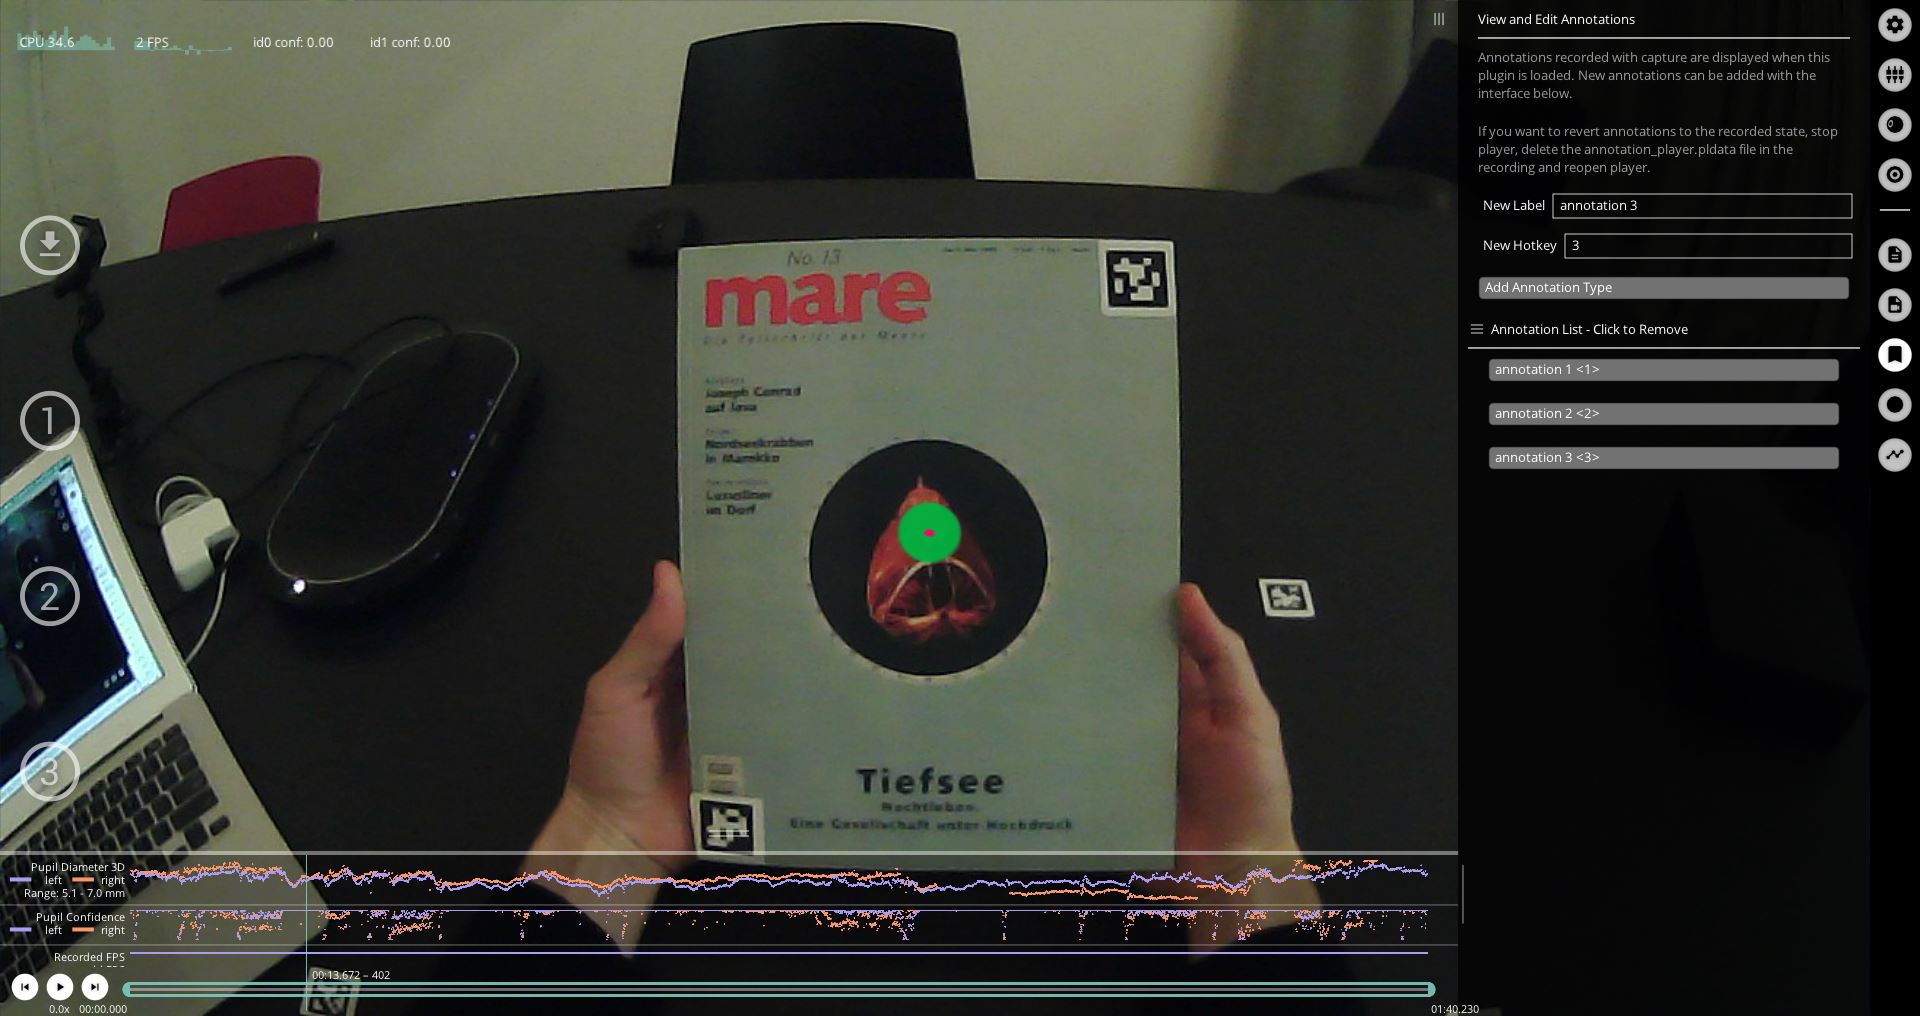
On export, the annotation plugin writes the annotation data to annotations.csv. It includes at least the following keys:
index: World frame index during which the annotation started or happenedtimestamp: Start time or timestamp of the annotation in Pupil timelabel: Annotation labelduration: Duration of the annotation
TIP
Any custom field encountered in the annotations will be exported as an additional column. Their values will be converted to strings using Python's string representation. Therefore, it is recommended to use primitive types (strings, integers, floats) as value types for custom fields.
Annotation hotkey definitions are stored in the recording directory: <recording dir>/offline_data/annotation_definitions.json with the format:
{
    "version": 1,
    "definitions": {
        "<label>": "<hotkey>"
    }
}
When a new recording is loaded, Pupil Player will attempt to load the annotation definitions from the recording-specific file. If it is not found or invalid, the last known set of annotation definitions will be loaded from Pupil Player's session settings.
Fixation Export
Fixations are exported to fixations.csv, containing the following fields:
start_timestamp- Timestamp of the first related gaze datumduration- Exact fixation duration, in millisecondsstart_frame_index- Index of the first related world frameend_frame_index- Index of the last related world framenorm_pos_x- Normalized x position of the fixation’s centroidnorm_pos_y- Normalized y position of the fixation’s centroiddispersion- Dispersion, in degreesconfidence- Average pupil confidencemethod-2d gazeor3d gazegaze_point_3d_x- x position of mean 3d gaze point, only available ifgaze 3dmethod was usedgaze_point_3d_y- y position of mean 3d gaze point, only available ifgaze 3dmethod was usedgaze_point_3d_z- z position of mean 3d gaze point, only available ifgaze 3dmethod was usedbase_data- Gaze data that the fixation is based on