Best Practices
Tips for conducting eye tracking experiments with the Pupil Core eye tracking platform.
Calibrating
Calibrate with Points That Resemble the Experimental Condition
If your stimuli are at a fixed distance to the participant, make sure to place calibration points only at this distance. If the distance of your stimuli varies, place calibration points at varying distances. Make sure that your calibration points cover the outermost bounds of your gaze. Choose a calibration background color and brightness that matches your stimuli.
Validate Your Calibration
Perform a validation after the calibration to check the accuracy. If the validation reports a high accuracy error, you need to perform another calibration. Make sure to use different points for validation than you used for calibration.
Avoiding Slippage
Slippage is the effect of the headset slipping on the participant’s head. Slippage is almost inevitable if the participant moves their head or facial muscles. Slippage will lead to reduced accuracy and can accumulate over time.
Split Your Experiment into Blocks
If your experiment allows for small breaks in between tasks, then you should consider splitting your experiment it into blocks. For every block you should re-calibrate (and validate) at the beginning to reset any accumulated slippage errors.
Choose the Right Gaze Mapping Pipeline
In the calibration menu you can select a gaze mapping pipeline. By default Pupil offers a 2D and a 3D pipeline, which have different tradeoffs.
The 2D pipeline offers the best accuracy under ideal conditions (< 1° visual error). However, it is very sensitive to slippage. Choose the 2D pipeline if:
- Your participants do not need to move their heads.
- You can have very short blocks.
- You want the best possible accuracy.
The 3D pipeline will adapt over time to compensate for slippage errors. The tradeoff is that the best accuracy in perfect conditions is slightly below the accuracy of the 2D pipeline (~1.0°–2.0° visual error). Note that slippage will still have an effect on very long recordings. Chose the 3D pipeline if:
- Your participants need to move their heads.
- You cannot split your experiment into small blocks.
Record Everything
We recommend starting to record prior to calibration. This is valuable because it enables you to capture all the data needed for pupil detection and calibration so that you can make parameter adjustments, and even recalibrate post-hoc in Pupil Player. Below is a recommended protocol:
- Start recording in Pupil Capture.
- Ask the participant to slowly look around while keeping the head stable for a couple of seconds to sample different gaze angles. This will allow the eye model to stabilize at the start.
- Perform a calibration.
- Perform a validation. If the error is too high, restart the block.
- Perform your experiment.
- Perform another validation. This can give you an estimate of how much slippage error you accumulated during the experiment. If you are recording multiple blocks with a non-fixed calibration setup, you can also re-use the calibration session of the following block as post-validation for the previous block.
- Stop recording.
Participants
The less movement your participants will exhibit during an experiment, the more accurate your results will be. This includes movements of head, but also of facial muscles. In order to minimize unnecessary movement, you should:
- Make sure the participant is in a comfortable position that they can maintain during the experiment.
- Make sure the participant can comfortably read all instructions and does not need to squint.
- Note: If the participant can keep a relaxed face during the experiment this will minimize slippage.
- Ask your participant to not touch the headset (e.g. by scratching their head). If they need to interrupt the block, they should ask and you will need to restart the block and recalibrate.
Fixation Filter Thresholds
Choosing appropriate thresholds for the dispersion-based fixation filter depends on the nature of the viewing task. It is worth noting that there is no 'gold standard' approach. Often a decision is reached based on previous literature and/or professional judgment following inspection of gaze data and classified fixations. As an example, we refer the reader to this paper which provides a quantitative analysis of dispersion thresholds for chess players.
Errors
Depending on the parameter configuration, the fixation detector can make three types of errors:
A. False negatives - Actual fixations are not being detected, e.g. due to maximum dispersion too low; minimum duration too high
B. False positives - Multiple actual fixations including their connecting eye movement (e.g. saccades) are being detected as a single fixation, e.g. due to maximum dispersion too high
C. Too many consecutive true positives that could be grouped to a single fixation, e.g. due to maximum duration too low, or maximum dispersion too low
Typical Scenarios
Here we consider three scenarios and how the choice of filter thresholds might influence classified fixations.
- A seated person fixates a static target. Their head is mostly stationary. Only small compensatory eye rotations are needed to keep the target stabilised on the fovea. Fixations are long.
In this task, setting maximum duration too low could lead to type C errors. If a fixation lasts 400ms, filtering with a maximum duration of 200ms will classify two fixations instead of one. Ensure the maximum duration accommodates your expected fixation durations.
- A seated person scans for appearing targets which disappear suddenly. They initiate many short rapid shifts of gaze from one region to another, interspersed by short fixations.
Setting minimum duration too high in this task could lead to missed classifications (type A errors). If fixations are around 120ms, but the minimum duration is 400ms, fixations go undetected. Setting the minimum duration too low can lead to very short detections that one would not consider a fixation (type B error). Ensure the minimum duration is appropriate for the viewing task.
- A dynamic environment where a walking person gazes at a sign. Their head is moving considerably when compared to the previous tasks. Larger compensatory eye rotations are needed to stabilise the region of interest on the fovea due to cyclic movements of the head and forward progression. The recorded gaze points are dispersed over a greater area (this is an inherent issue with detecting fixations in scene camera space instead of the real world).
Setting the maximum dispersion too low could lead to false negatives (type A error) or a series of consecutive detections that should have been grouped to a single fixation (type C error). For example, if the gaze points are dispersed over 2 degrees due to bigger eye rotations, filtering with a maximum dispersion of 1 degree could classify two separate fixations instead of one. Setting the maximum dispersion too high might group fixations together that should have been considered separate fixations. Ensure the maximum dispersion accommodates your viewing task.
Blink Detector Thresholds
In general, the default values for the Blink Detector should work reasonably well on good quality eye data with robust pupil detection. However, it is often necessary to adjust the thresholds in the event that blinks are not accurately classified. Therefore, it is important to understand the types of errors that can occur and to be able to spot them when they occur, thereby enabling you to make appropriate adjustments.
Errors
A. False negatives - Blinks are not being detected, e.g. due to the onset threshold being too high
B. False positives - The onset threshold is set too low and blinks are classified even though they did not occur
C. The end of a blink is not detected due to the offset threshold being too high. This can lead to erroneous blinks that have unreasonable durations
Pupil Detection and Blinks
It is worth noting that poor pupil detection in general can lead to false negatives. In such instances, adjusting the thresholds can make it easier to detect blinks, but also increases the chance of false positives. It is worth taking the time to ensure an optimal setup with regards to eye camera positioning and 2d detector settings so that the pupils are well-detected when the eyes are open.
Synchronization
Pupil Core is often used concurrently with third-party devices and software (e.g. physiological sensors, motion capture, stimuli presentation). In order to correlate the data between these, temporal alignment is of great importance.
How you go about synchronizing Pupil Core with other devices or software will depend on the setup, but there are three common approaches (steps 2–3 leverage our Network API):
TIP
Read about Pupil Core's timing definitions here.
TIP
When using multiple Pupil Core devices (running on the same or multiple machines), be sure to turn-on the Network Time Sync Plugin which takes care of Pupil Time synchronization. The Pupil Groups Plugin also helps when using more than one Pupil Core device simultaneously.
1. Lab Streaming Layer (LSL)
We maintain a Plugin for LSL that publishes gaze data in real-time using the LSL framework. This enables unified and time-synchronised collection of measurements with other LSL supported devices.
The plugin synchronizes Capture's own clock, Pupil Time, with the pylsl.local_clock(). This allows the recording of native Capture timestamps and removes the necessity of manually synchronizing timestamps after the effect, which makes for an accurate and easy to implement solution.
2. Custom Clocks
By default, most third-party devices and software come with their own clock to measure time consistently. These clocks rarely share a common starting point which would allow for automatic time alignment. However, they usually guarantee to be monotonically increasing and are very accurate when it comes to measuring time differences (like Pupil Time).
In this tutorial, we demonstrate a simple real-time method to synchronize Pupil Time with a custom clock (e.g. used by third-party software). For an even more accurate and stable time sync, see our Pupil Time Sync Protocol.
3. Annotations
You can use our Annotation Plugin to make annotations with a timestamp in the recording on desired events, such as trigger events. Annotations can be sent via the keyboard or programmatically. This script demonstrates how you can send remote annotations over the network.
Pupillometry
Pupillometry is the study of temporal changes in pupil diameter in response to external light stimuli and/or cognitive processing. Pupil Core reports pupil diameter in mm provided by the pye3d model: diameter_3d, and in pixels as observed in the eye videos: diameter.
Pupil size in pixels is dependent on the eye-camera to pupil distance and is not corrected for perspective. Pye3d, on the other hand, accounts for differences in eye-camera to pupil distances and corrects for perspective. It thus more accurately reflects pupil size and will be preferable for most users.
pye3d model
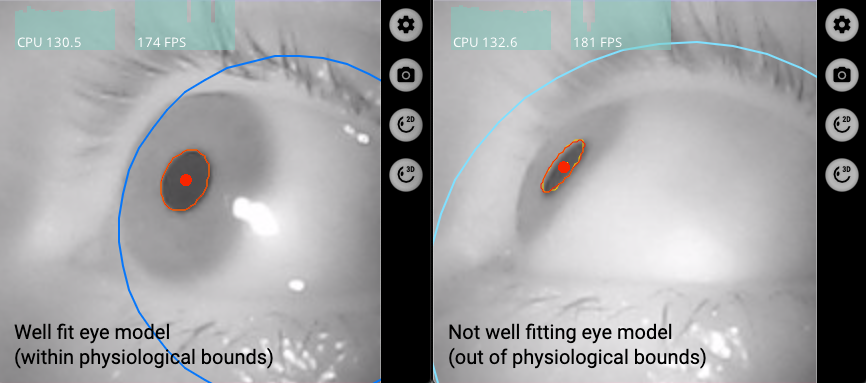
A well-fit pye3d model is important for accurate estimates of pupil size in mm. To generate a well-fitting model, sample sufficient gaze points from a variety of gaze angles, e.g. by moving the head around while looking at a fixed position. A well-fit model is visualized by a stable circle that surrounds the modelled eyeball, and this should be of an equivalent size to the respective eyeball. A dark blue circle indicates that the model is within physiological bounds, and a light blue circle out of physiological bounds.
See the pye3d release notesfor further details.
Freeze the pye3d model
TIP
A frozen model is not robust to headset slippage (erroneous movements of the headset on the wearer) as it is prevented from adapting to headset movements. If using a frozen model, and the headset slips during the experiment, erroneous pupil size estimates can occur. Therefore, only use this option if the experiment is tightly controlled with limited head movements, and keep recordings short and free of slippage as much as possible.
The pye3d model regularly updates to account for headset slippage. In certain situations, this can lead to incorrect pupil size estimates:
- Actual Headset Slippage: The headset slips on the wearer, and a 2d pupil datum is generated prior to the 3d model adjusting
- Model Adjustment Error: No slippage occurred, but there is an abrupt change to the calculated 3d eyeball position (due to errors in the estimation). This can lead to a false change in pupil size estimation even if the actual pupil size was constant.
One solution to prevent 'Model Adjustment Error' is to freeze the model, which is available as a toggle in the eye windows. You should only freeze the model when it is well-fitting as per the description above. Pupil size errors due to 'Actual Headset Slippage' can only be avoided by eliminating headset slippage, which should be a key aim when performing pupillometry in general, and especially when freezing the model.
TIP
You can also freeze the model when running post-hoc pupil detection in Pupil Player. Moreover, clicking 're-detect' after freezing the model will apply the frozen model from the beginning of the recording.